Last Updated: 4:44 PM 01/03/2025
Let’s dive right in! ![]()
There are some dependencies needed to get Bolt.diy⚡ running on your local machine ![]() . These are also generally required for building and deployment, but this tutorial will be so EASY, we are going to skip all that noise
. These are also generally required for building and deployment, but this tutorial will be so EASY, we are going to skip all that noise ![]() . We are going to use GitHub Actions to build everything in the cloud
. We are going to use GitHub Actions to build everything in the cloud ![]() . And the best part? Bolt.diy already has mostly everything you need setup for you, with some minor adjustments (basically need to remove a few things and set some flags).
. And the best part? Bolt.diy already has mostly everything you need setup for you, with some minor adjustments (basically need to remove a few things and set some flags). ![]()
No![]() need to install the latest .NET version (can be an issue on Windows), have Node (npm and pnpm), or even Git. No needing to deal with security
need to install the latest .NET version (can be an issue on Windows), have Node (npm and pnpm), or even Git. No needing to deal with security ![]() or any type of setup
or any type of setup ![]() . That’s how easy this is going to be. So, follow all steps closely and let’s see who gets to the finish line first!
. That’s how easy this is going to be. So, follow all steps closely and let’s see who gets to the finish line first! ![]()
Prerequisites: There are only three; sign up for a Cloudflare ![]() , GitHub
, GitHub![]() , and HuggingFace
, and HuggingFace ![]() account if you do not already have them.
account if you do not already have them.
They are all completely FREE! ![]()
Setting up GitHub ![]()
-
Browse to the GitHub page and sign in, or create an account.
-
Browse to the Bolt.diy GitHub Page
-
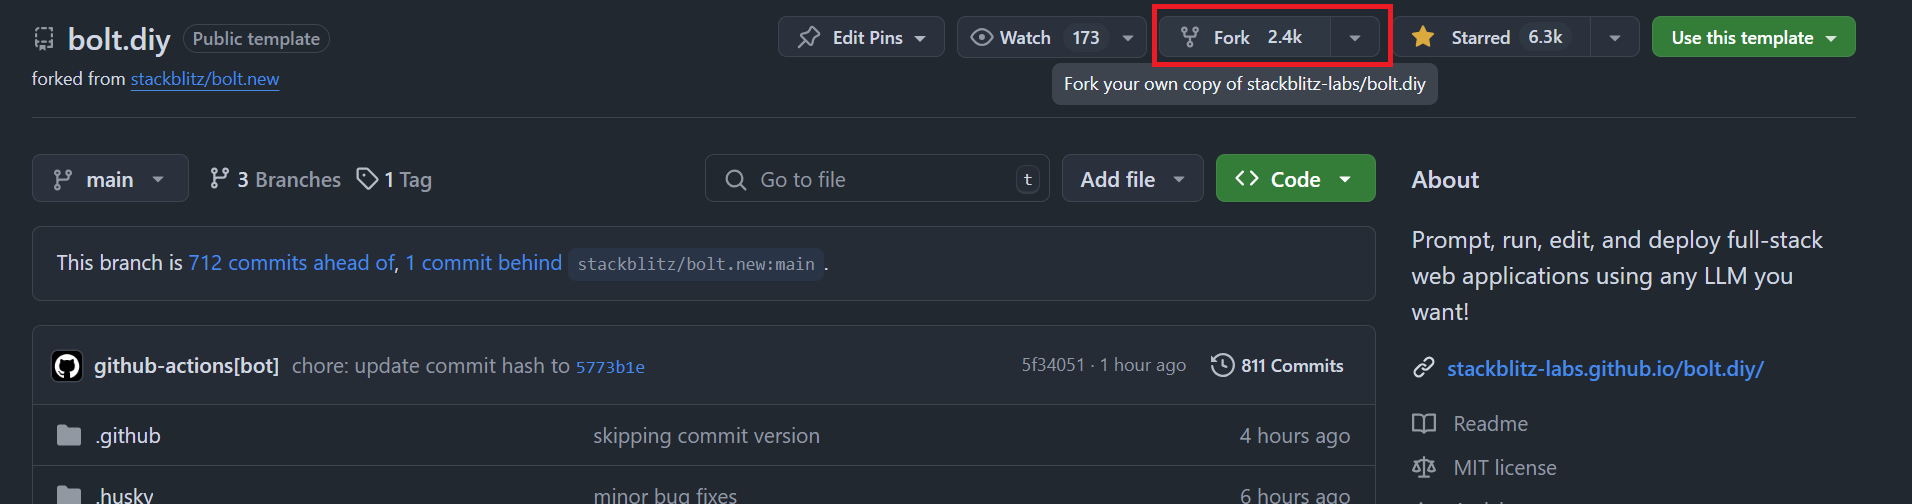
Click Fork

-
In the “Create a new fork” dialog, click the “Create fork” button
Note: Do not check "Copy themainbranch only, so we have the ability to switch them later (update). And while you could just sync thestablebranch, it’s probably best to pull all of them for the flexibility (for example if you need, or want, to change branches later). -
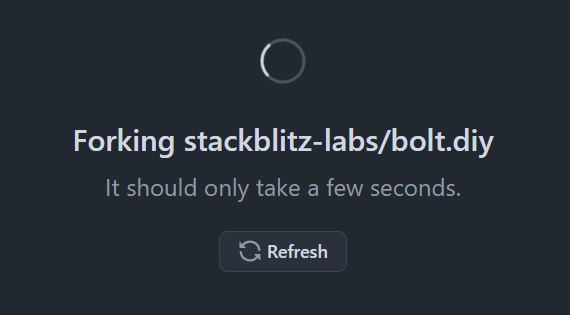
A little bit of waiting…
-
Click “Code” and browse to “.tool-verions”
-
Switch to the
stablebranch from the drop-down.
Note: in version 0.0.3 Bolt.diy was changed to have astablebranch becausemainis what PR’s are committed and resolve to. -
Click on the
.tool-versionfilename to open it and delete the file.
Notes: this file causes issues with the deployment. -
Commit the Changes back to your Fork:
-
Do the same for the
wrangler.toml
Note: Because otherwise Cloudflare will detect it, use it to deploy, and then overwrite the environment variables when we move onto the Cloudflare setup. If you want to deploy without keys, that’s perfectly fine, just note that Bolt.diy does a periodic check whether or not they are set and without them it may not work (not sure if this was changed in the most recent merge). Alternatively, if you used git to clone the repo locally, you could just rename them (but that means more steps).


Setting up Cloudflare⚙️
-
Sign up for, or login to, Cloudflare.
-
In Cloudflare click on “Workers & Pages”

-
Click “Create”
-
Click on “Pages” tab and then “Connect to Git”
Note: If this is the first time connecting git, Cloudflare will step you through the process and you will need to follow steps to authorize it. -
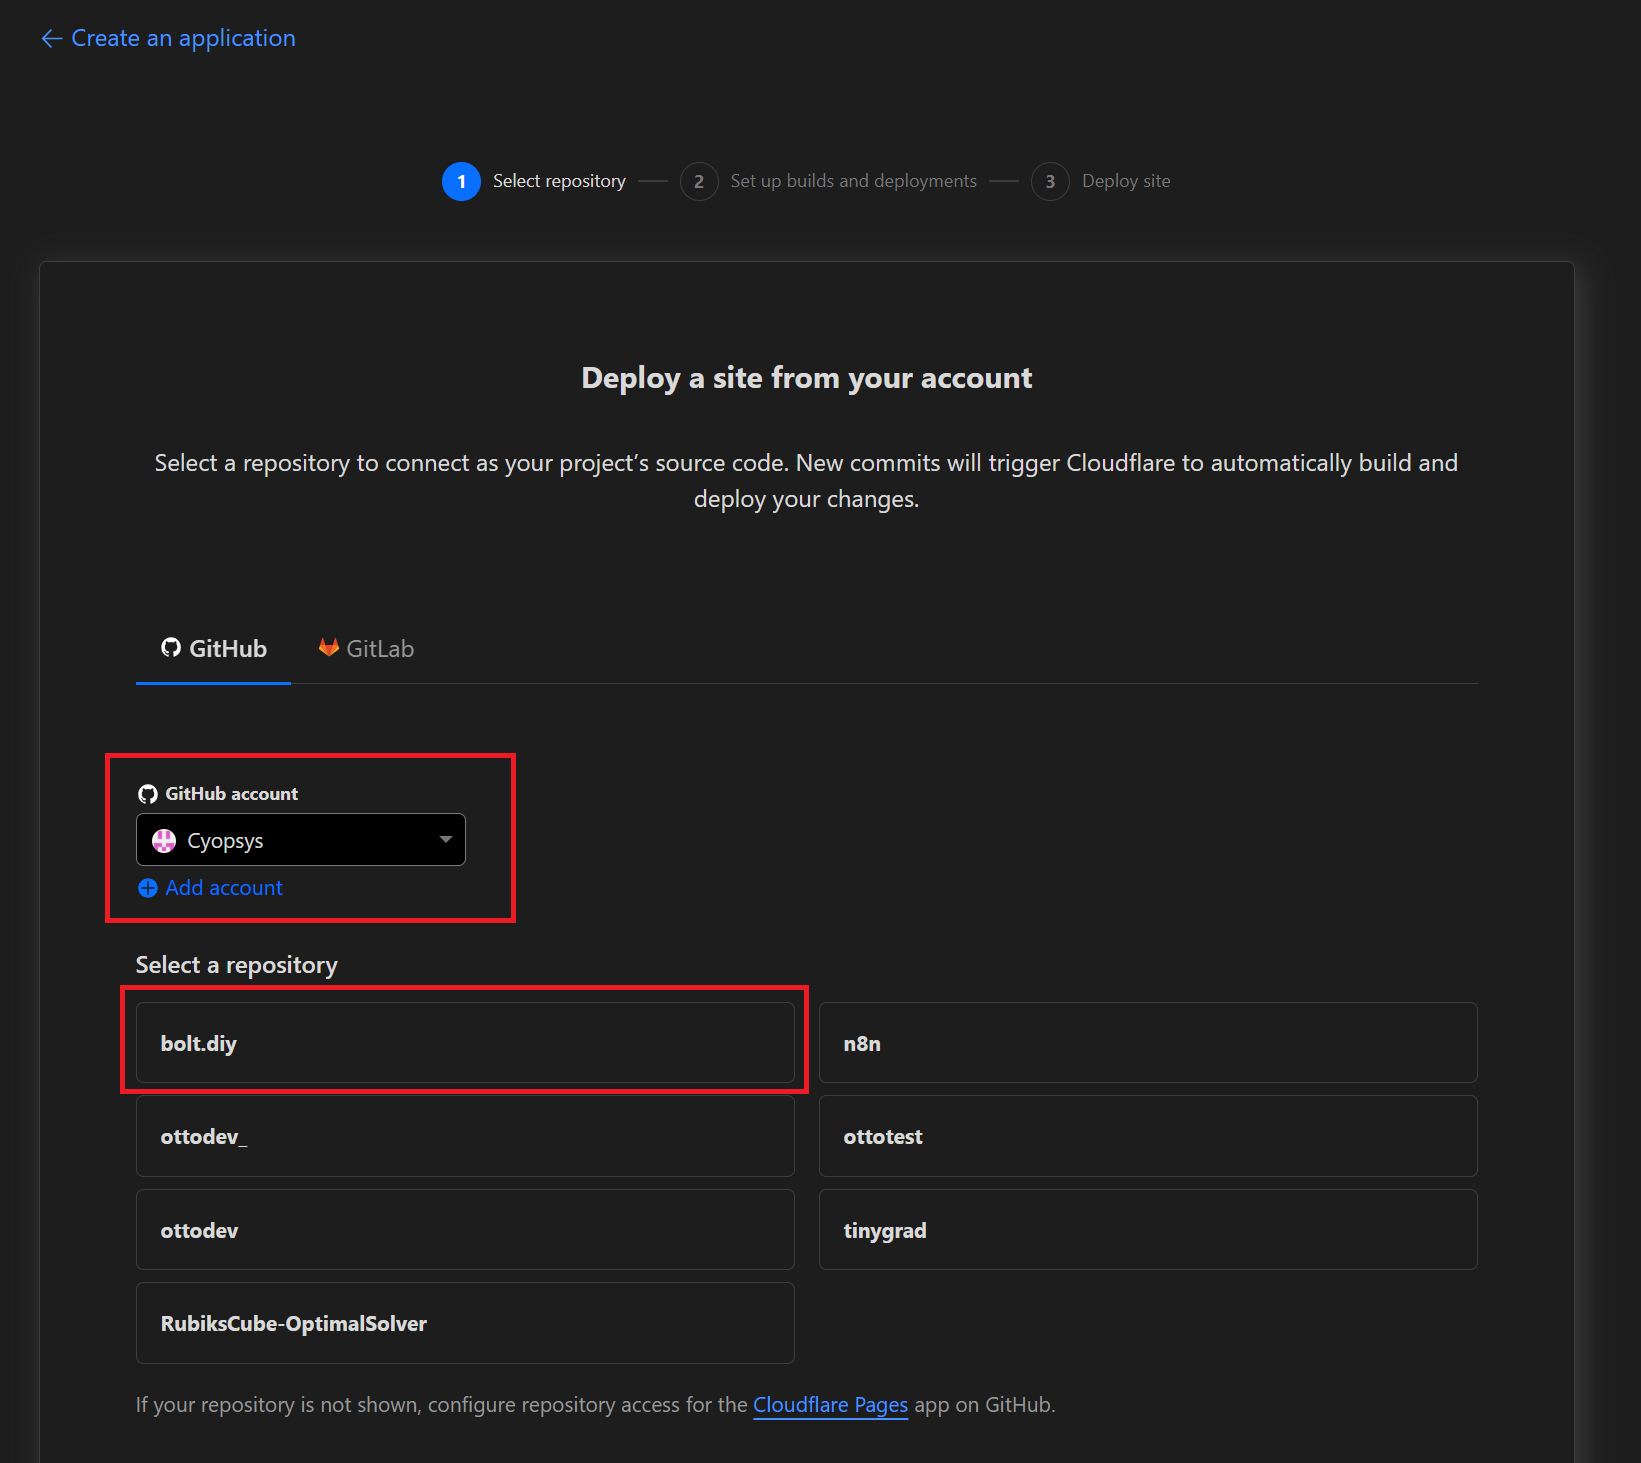
Select your GitHub account and Repository (bolt.diy)
-
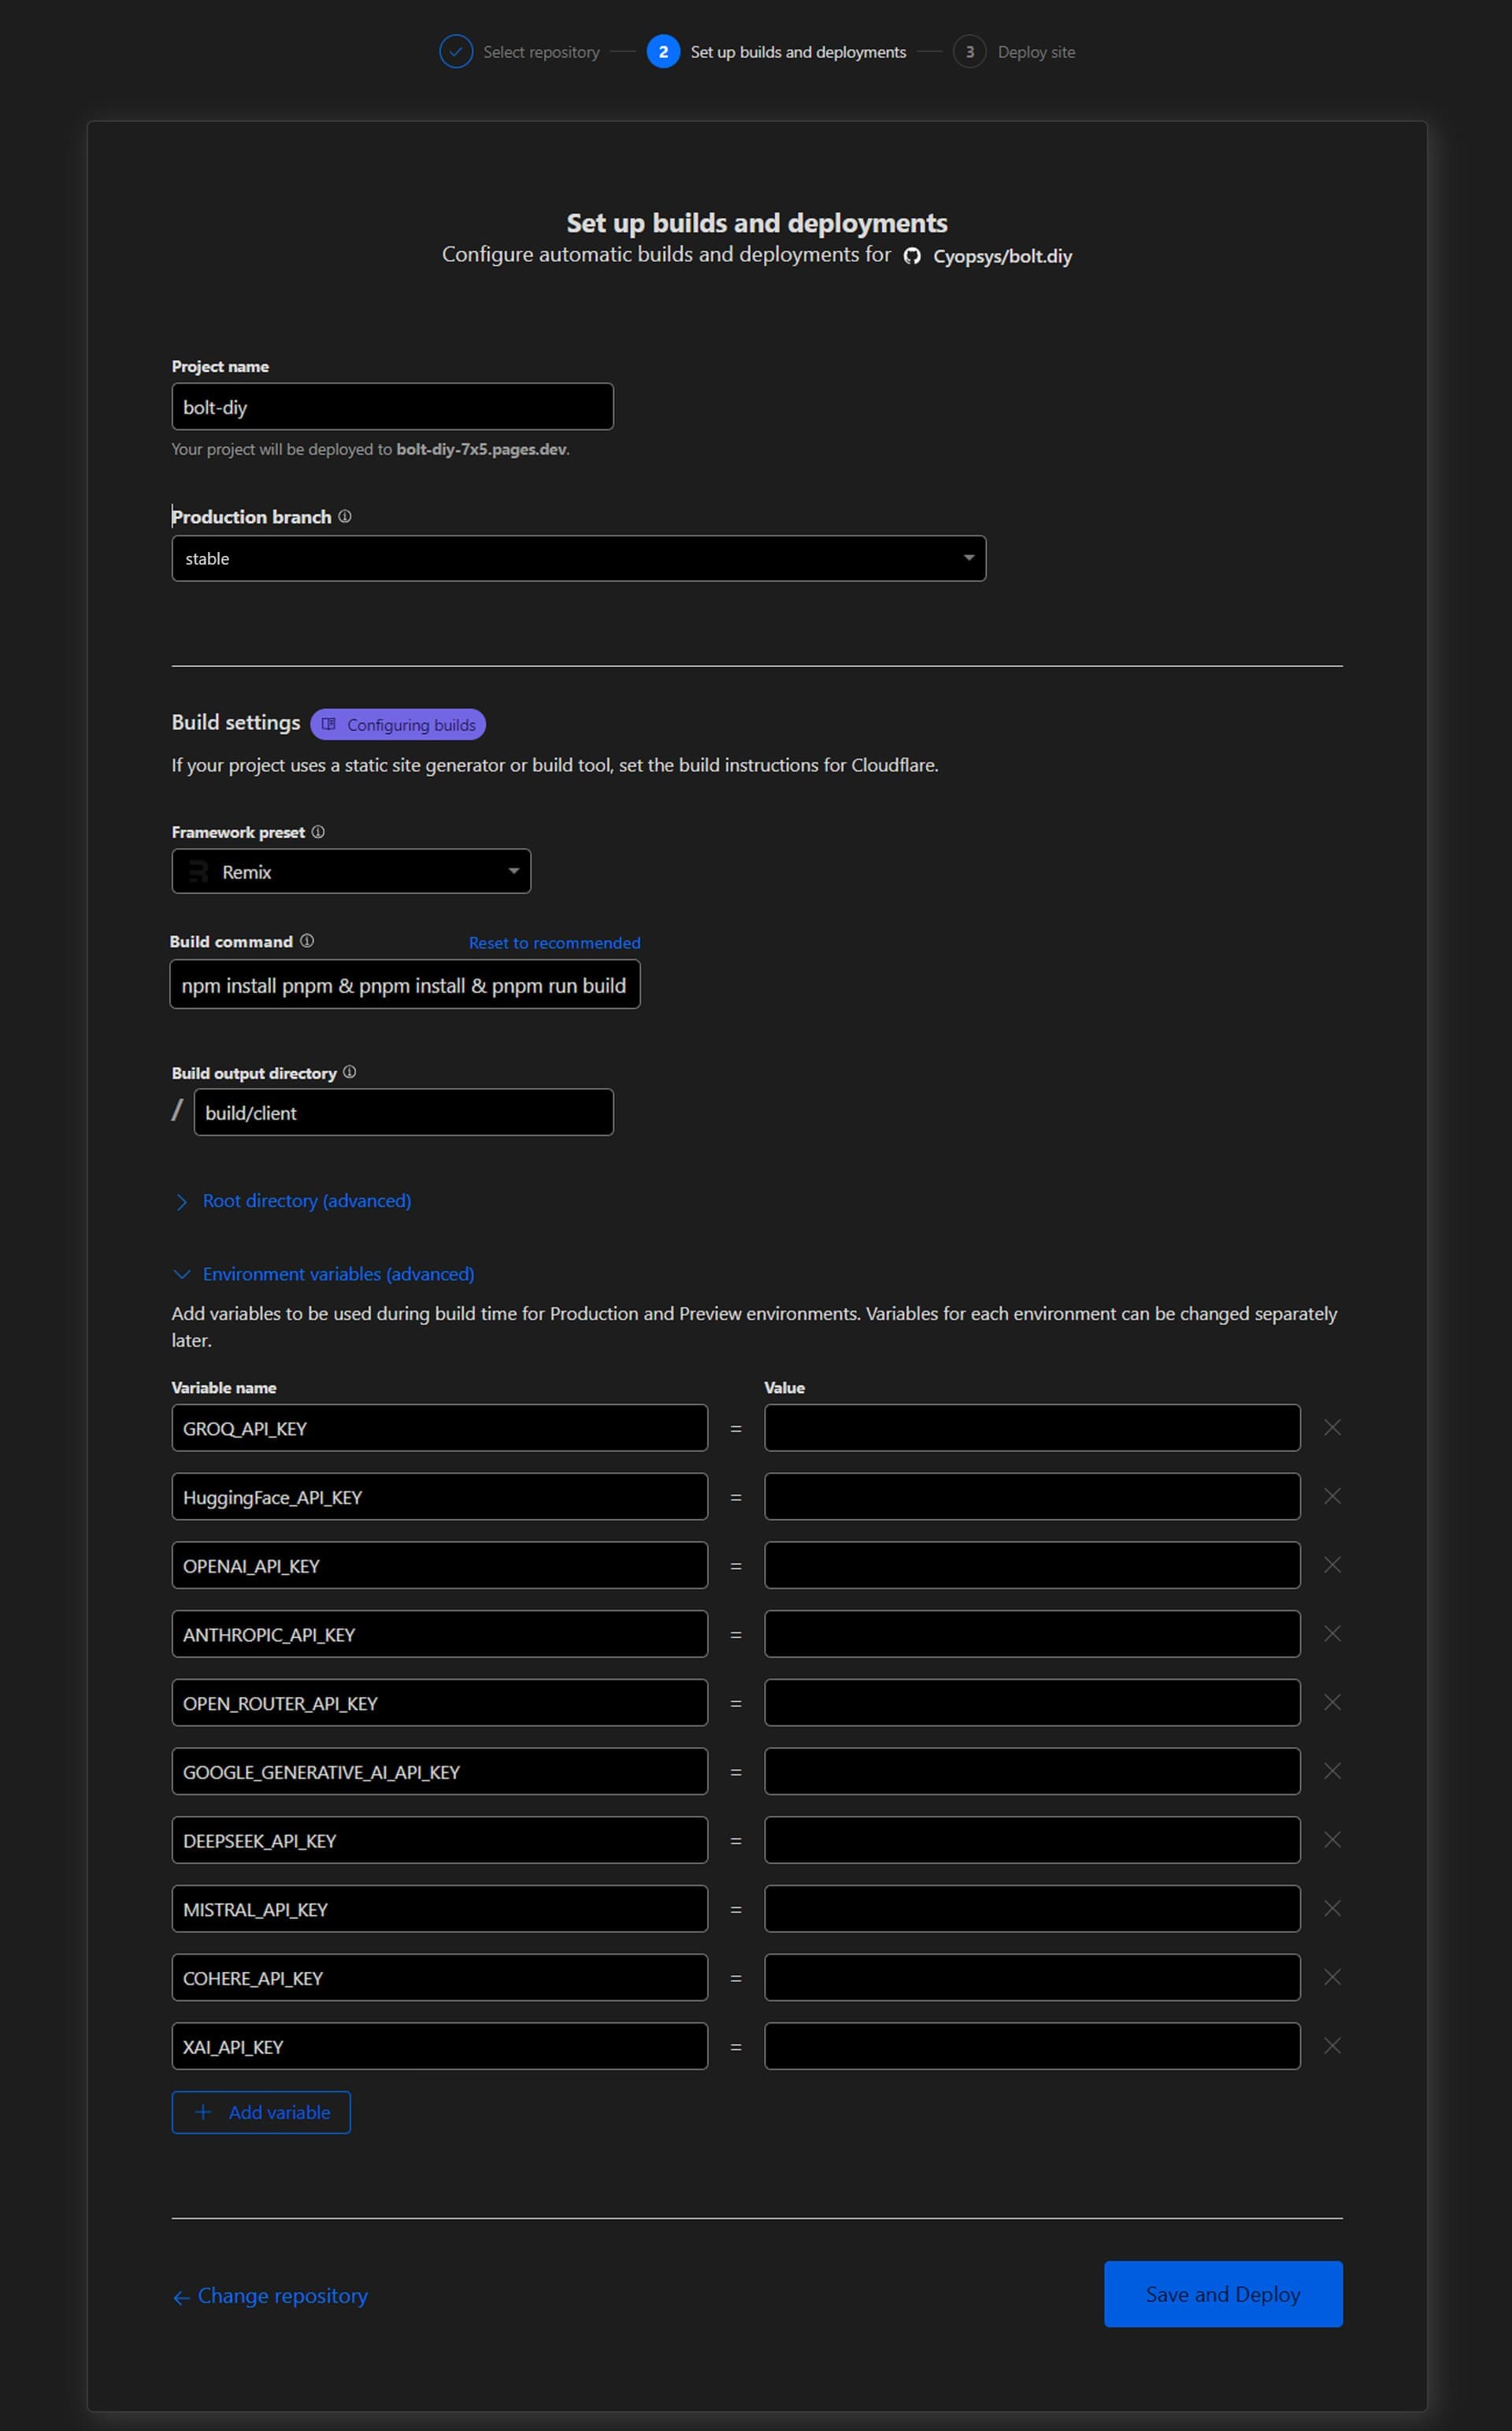
Configure “Setup and Deploy” options:
a. For Framework preset, select"Remix"from the drop-down.
b. For Build command, we will be modifying this to be:
npm install pnpm & pnpm install & pnpm run build
Note: Add your environment variables exactly the way they are listed in your Environment Variables (.env file), see screenshot (you can open the .env.example for reference). And DO NOT include the equals sign in the variable name as that’s intended as the separator between the variable and value (if you do, it will result in caching errors).
 WARNING: If you do not use
 pnpm run build(and leave the defaultnpm run build), then the deployment will appear to work fine, but the page styling will be screwed up. If this happens, it’s fine as you can just modify the build command (and “Retry deployment”, see Steps #12-13) but if you run into a broken page, then you know why. -
Click the “Setup and Deploy” button
Note: I did not include the keys in the image for security reasons, but make sure to add them here.
-
Build failed (calm down, it’s fine! It’s fine!³)
Note: we are not going to use wrangler and because of this the initial deployment will fail with error:Error: Failed to publish your Function. Got error: Uncaught Error: No such module "node:process". imported from "functionsWorker-{cache_hash_key_value}.js"
Note: In the newest version of Bolt.diy the build may not fail, but just confirm steps 8-10. It appears that something was changed to set thenodejs_compatcompatibility flag. -
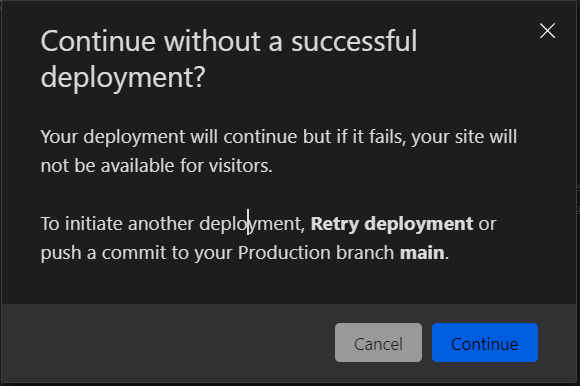
Click “Continue to project” and agree to the Warning Prompt:
-
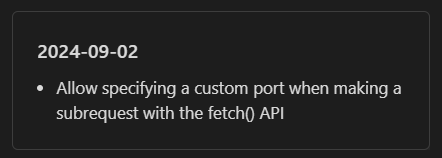
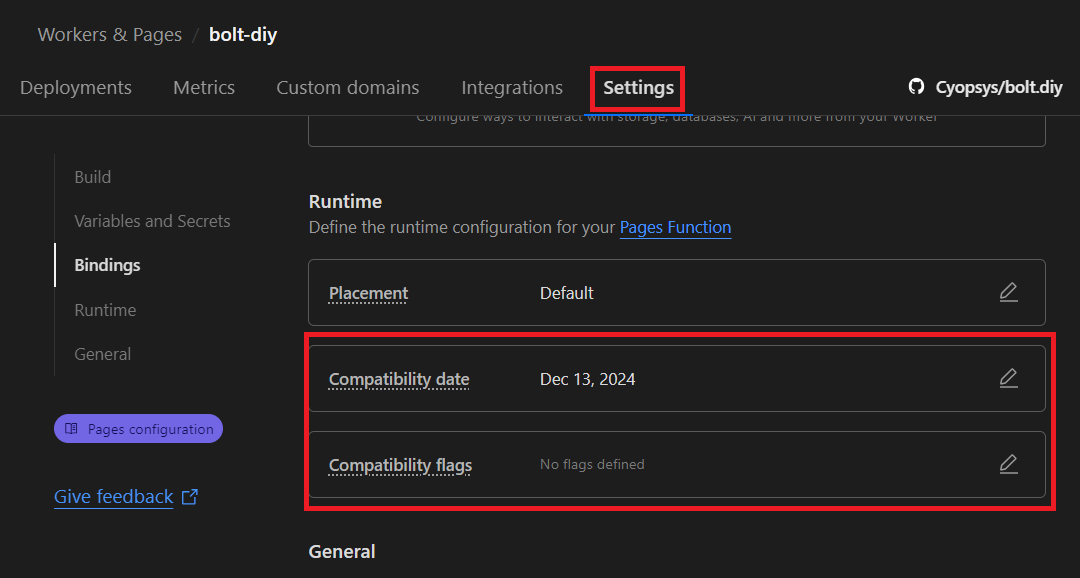
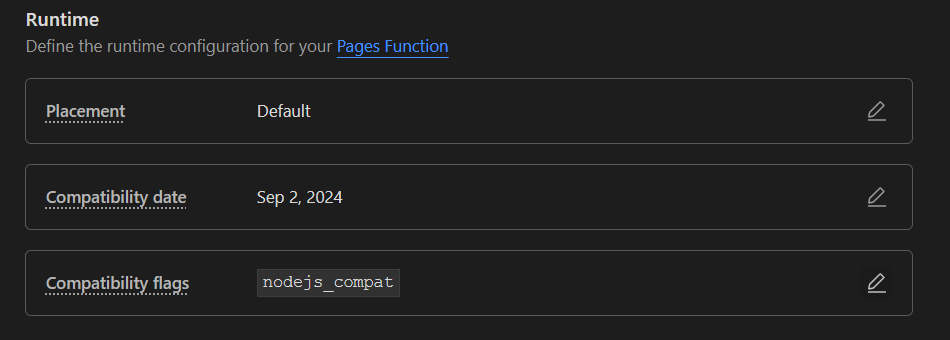
Click Settings and scroll down to Runtime

a. For “Compatibility date”, click edit, select2024-09-02, and click “Save”
b. For “Compatability flags”, click edit, set tonodejs_compat, and click “Save”
Note: the option will not be in the drop-down list, you will need to type it in and select the “tag” for it.
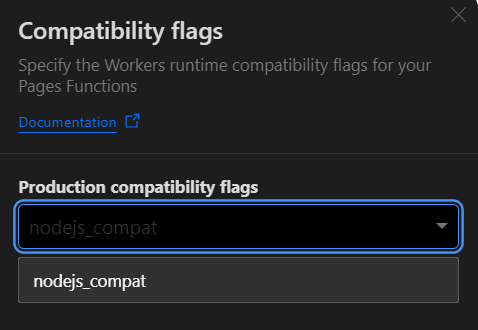
c. When you are done, it should look like this:
-
On “Branch control”, click the edit icon (pen) and change branch to
stable

Note: When the article was first written, there was no stable branch, but now this is the recommended branch to use. -
Click on the “Deployments” tab, then “View Details”:
-
Click “Retry deployment”
Note: You could have “triggered” this process simply by modifying a file, committing the changes (or pushed them locally), and it would have re-deployed as well (see Step #14). -
Wait for it… Success! All Setup and Deployed!

Note: Due to caching, the page might not load correctly the first time. But don’t worry, if there are no warnings up to this point, let’s continue and give the changes a little time to propagate. -
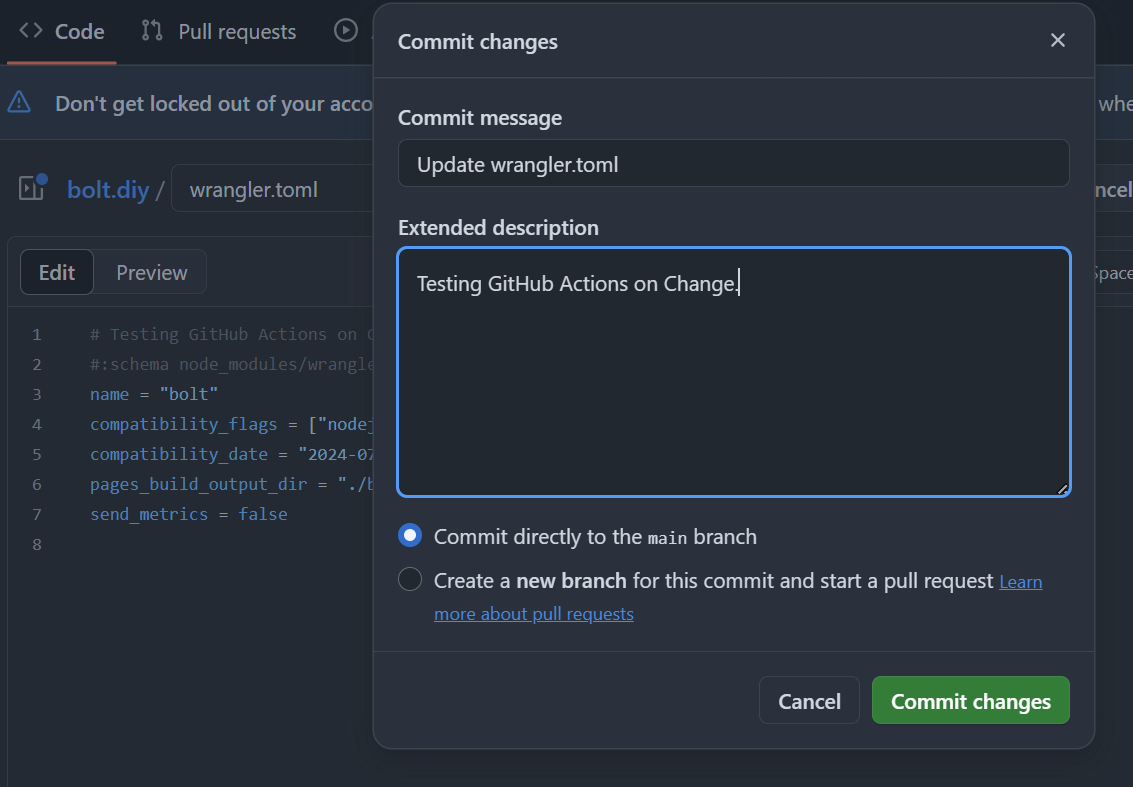
Updating (Just an FIY – Nothing to do here!)

Notes: The project is setup to activate GitHub Actions on Commit/Publish. We just need to modify a file to test it! This event would also be triggered if you did a Commit/Push the usual way on your local machine but we can also setup a schedule to do it for us. But that’s beyond the scope of this tutorial.
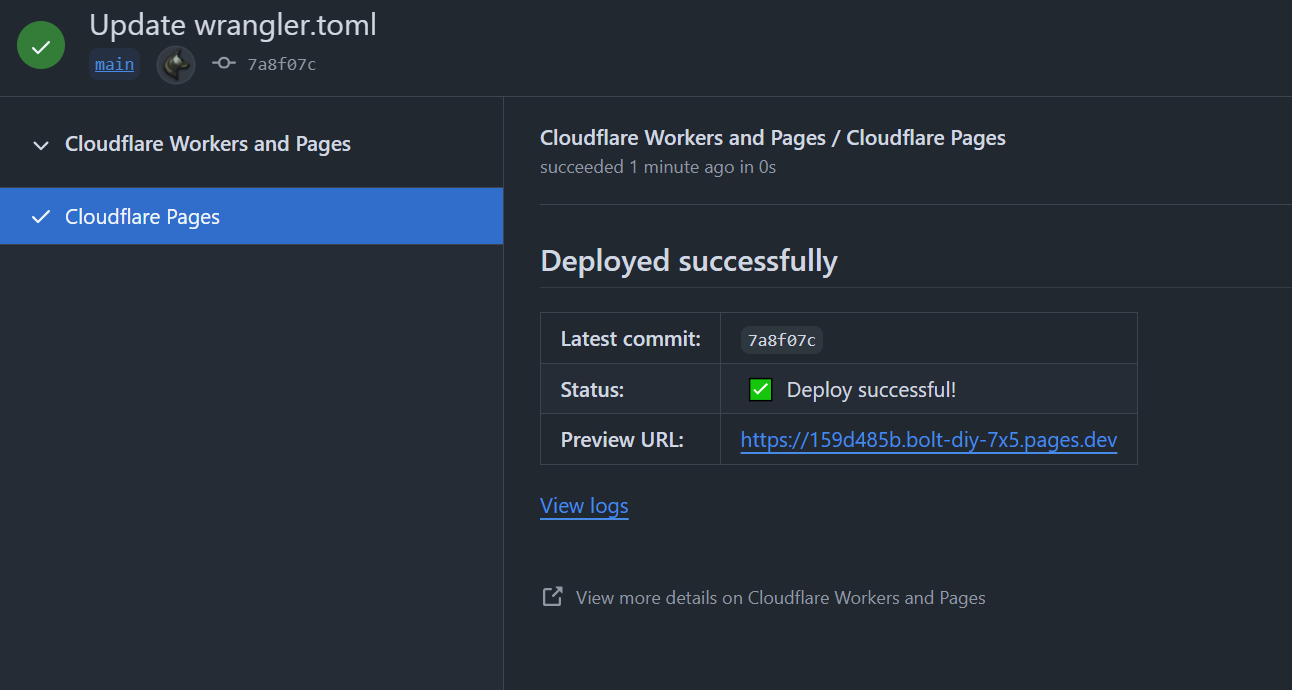
a. Notice if you go back to “code”, the runner was activated!
b. Success on change.
c. Now you can sync the fork, but just remember to delete or blank out the.tool-versions, andwrangler.tomlif they get re-created (not sure they will, I haven’t tested this yet).
-
Now lets check out our new deployment:
-
It’s alive!!! It works, and it costed nothing but a little time!!

And now you have your own Bolt.diy to play with and share!


Optional Steps: ![]()
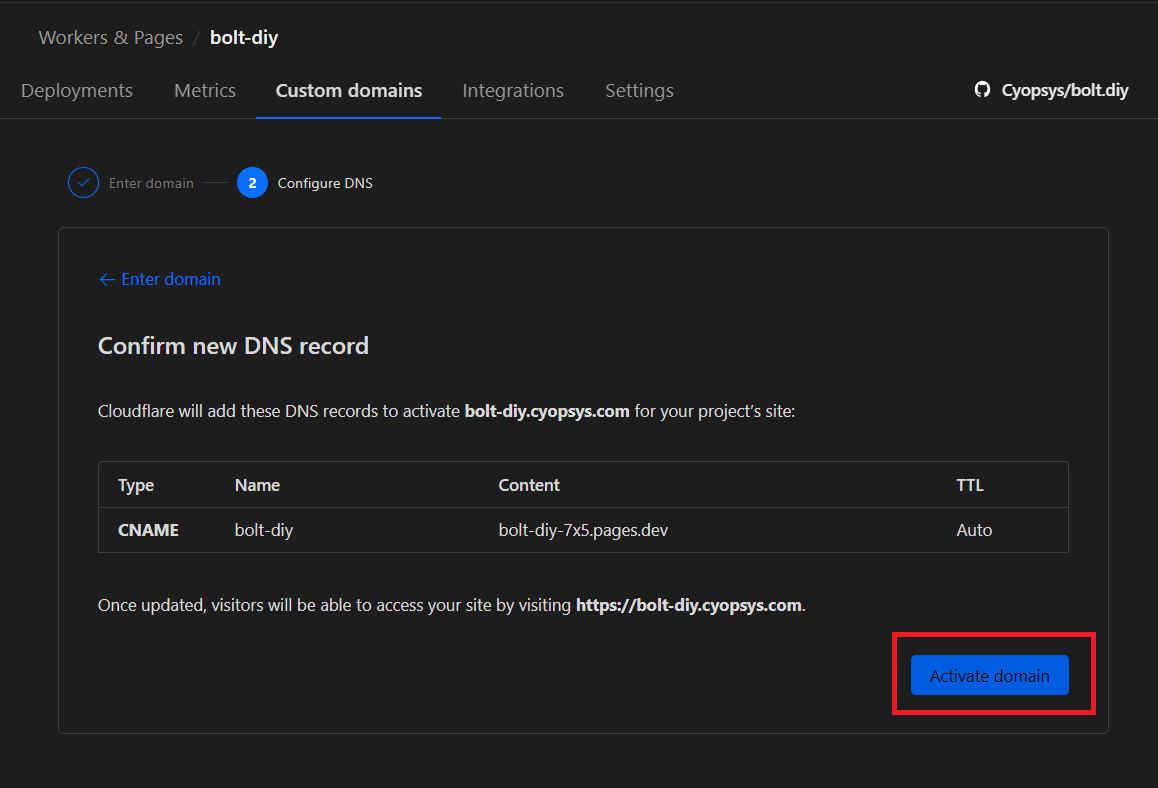
Setup a Custom URL ![]()
- If you already have a Domain name setup on Cloudflare, just provide the subdomain and the tool will take care of the rest for you (DNS records, etc.).
- Let Cloudflare do the work and click “Activate domain”
- Wait a few minutes, and done.

Updating Bolt.diy Deployment on Change
-
Go to your forked GitHub repo, change branch to “Stable” (or which ever one you are updating), and click the “Sync fork” dropdown"
-
Click on “Update branch” in the dropdown:
Note: Do not click “Discard X commits” and then you don’t need to delete the.tool-versionsandwrangler.tomlfiles each time.
-
Done.
Notice that updating the branch automatically trigger the Cloudflare Pages to re-build and deploy (there’s nothing else to do, just wait):
Note: You can also setup a GitHub action to do this automatically and just keep the repo up to date on change, but I haven’t created documentation for this yet. It’s honestly not that hard either and just keeps me from having to do it manually (or even remembering to).


TBD:
- User Authentication through Cloudflare Zero Trust
- Automatically update deployment through GitHub Actions.
- Connecting Local Models (Ollama, LMStudio, etc.) to Cloudflare Pages Deployment
- Integrating Supabase to Cloudflare Pages Deployment
Troubleshooting:
- Bolt.diy page styling is jacked up, you get a module error, vite missing, then you used
npm installat some point and/or did not update the build command. Check the instructions! - Error:
pnpm plugin is not installed? You did not remove the.tool-versionsand/orwrangler.tomlfrom your forked repo. See comment #108 - There are some known issues with Safari that cause a bunch of cache errors. Try Chrome/Edge/Firefox. No known fix yet. See comment #91 and #131.
- Error message after following guide? Likely did not change branch to
stable. Check instructions for details and comment #76. - Want to secure your Cloudflare Pages Deployment down, see comment #61
- Make sure there are not equals signs in your environment variables
- Make sure to set the compatability_flags date and
nodejs_compat - Ensure you are using the
stablebranch (see latest docs)
Last Steps: Test your Deployment
- Open the URL (either generated or Custom) and test that everything works.
- Please let me know if you run into issues and I can create a troubleshooting guide.
- We would all appreciate you dropping an issue item through the GitHub page, please just see if the issue already exists first.
Final Thoughts ![]()
This tutorial hopefully seems straight-forward but it took a lot of testing and process refining because there was really no good documentation on this. Hope it works for you, and you simply appreciate the effort (show some love – bookmark🔖 and give a heart❤️).
There will likely be updates to this tutorial in the future.
Thanks! ![]()
P.S. A PDF Version ![]() is available through my google drive (I’ll manage versions through there, so the link will always be the latest one).
is available through my google drive (I’ll manage versions through there, so the link will always be the latest one).
